
A white noise riser (elevator/white noise whoosh) is a common, nice to hear, and a useful sound effect. There are many explanations about making (producing) such a white noise riser, but I haven’t found one that is complete, in my opinion.
How to make a white noise riser sound effect? You can make a basic version of such a riser in five short explained steps, which are:
- Make a note that is 4, 7, or 8 bars long.
- Add a synthesizer with only a white noise oscillator and sustain active. Alternatively, add a white noise sample.
- Add an equalizer (EQ) plugin after the synthesizer or sample. Then set the low-pass filter of the EQ to 400 Hz with Q 1.00. Also, modulate this low-pass filter from 400 Hz to 12000 Hz over the full length of the drawn note. Plus, set the output audio volume to -3 dB.
- Add another EQ plugin after the first. Then set the high-pass filter of the EQ to 400 Hz with Q 0.71. Also, if we have a drawn note of 4 bars long, then we start to modulate at the beginning of bar 3 from 400 Hz to the end of bar 4 to 12000 Hz. Alternatively, if we have a drawn note of 7 or 8 bars long, then we start to modulate on the beginning of bar 5 from 400 Hz to the end of bar 7 or 8 to 12000 Hz.
- Add a reverberation plugin after the first EQ. Then change the preset of the reverberation plugin to a “large hall” preset, and then set these settings:
- mix (dry/wet) knob: 55%
- pre-delay: 35 milliseconds
- decay: 3 seconds
I did some research about white noise riser sound effects, and also over the years, I produced many of these risers. Furthermore, I provide the results of the research and experience here in an explanation in this post. This post provides information about how to make a professional white noise riser in three steps, with an extra three optional steps.
1. Make Some Playable White Noise
The basis of a white noise riser is a playable white noise, that can have any length. However, the most common lengths for a playable white noise for a riser are 4, 7, or 8 bars.
The most common way and also the method from this post is to make such a white noise riser in these two steps:
- Make a note that is 4, 7, or 8 bars long.
- Make the note playable with the white noise from a synthesizer, or an audio sample.
In the DAWs I have used, a common way to make a note is by drawing them in a piano roll. The pitch of the note doesn’t matter, because white noise is a signal with every (at least every hearable) frequency on the same audio volume. So we can’t make something at a specific pitch with only default white noise.

Probably every synthesizer can make some white noise, and most of the time we can do this by setting an oscillator to the white noise waveform. Also set the attack, decay, and release envelopes to 0%. Set only the sustain envelope to 100%. Furthermore, my advice is to set the synthesizer so it can play white noise without anything else.
The reason for this advice is that other synthesizer settings probably only complicate things. Complicating things without improving the result is useless, and it can confuse yourself.
Result
By following this step, we have now a playable white noise in the desired length.
2. Moving Equalization Filters
The hearable rise effect in the white noise riser comes from a low-pass filter and a high-pass filter that both moves over a period.
There are two options for the filters we can use. The first option is to use the filters from the synthesizer, and the second one is to use the filters from an equalization (EQ) plugin. To my experiences are the filters on synthesizers too limited (like not very precise), for this reason, we use here an EQ plugin.
There are also two options for opening the filter more and more over time. The first option is doing this manually, like turning a knob yourself, and the second option is using automation. The most common and precise way is to use automation, which we also use here.
In this step, we use two EQ plugins, and the reason for this becomes clear in the following steps since we add one or two plugins between the EQs.
EQ Modulation
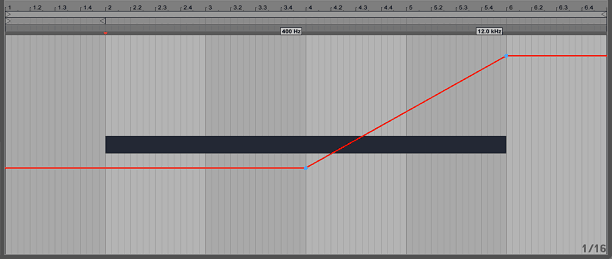
First, add an EQ plugin after the synthesizer or audio sample, and set in the EQ the low-pass filter to 400 Hz with Q 1.00. Then modulate this low-pass filter from 400 Hz to 12000 Hz over the full length of the drawn note. This drawn modulation can be a straight line.
The reason for Q 1.00 is that it functions a bit like adding resonance. Such resonance gives the white noise riser a bit like a whistling sound. This sound makes the riser better hearable when it is played together with other elements at the same time.
When our EQ plugin doesn’t have the option to set the low-pass filter at Q 1.00, then we can also add a bit resonance to it. However, if the EQ also doesn’t have a resonance setting, then we should probably use a different EQ.
If the EQ plugin has the option to set the output audio volume, then set this to -3 dB. The reason for lowering the output volume is that next step makes the volume higher, which can result in clipping.
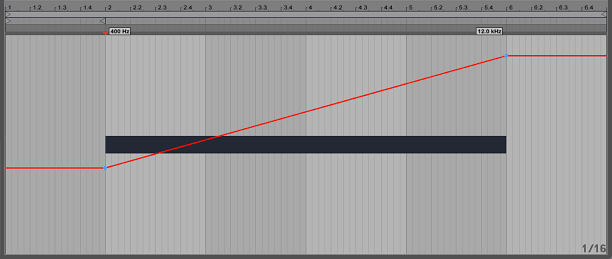
Add another EQ plugin after the first added EQ, and set in the EQ the high-pass filter to 400 Hz with Q 0.71. If we have a drawn note of 4 bars long, then we start to modulate at the beginning of bar 3 from 400 Hz to the end of bar 4 to 12000 Hz. Alternatively, if we have a drawn note of 7 or 8 bars long, then we start to modulate on the beginning of bar 5 from 400 Hz to the end of bar 7 or 8 to 12000 Hz.
For the high-pass filter, the drawn modulation can also be a straight line.

Result
By following this step, we have now a playable white noise that rises over a period, and the sound is cleaner since the use of the EQ.
3. Practical Reverberation
For me, reverberation is an extremely hard and a huge topic, and I don’t know enough theory to explain things well in my own words. However, I analyzed many books, videos, and EDM music projects from others and myself (with many test projects).
This analyzing gave me helpful and practical settings to use for reverberation. I use these settings with confidence, and they sound great in my opinion and also to some other peoples opinion.
Here follow some steps by which we can add a reverberation plugin with practical settings to the white noise riser:
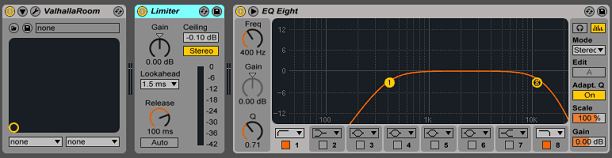
- Add a reverberation plugin between the two added EQ plugins from the previous step.
- Change the preset of the reverberation plugin to a “large hall” preset, as far as I know, most (if not all) reverberation plugins have such a preset.
- Set the reverberation to these settings:
- mix (dry/wet) knob: 55%
- pre-delay: 35 milliseconds
- decay: 3 seconds

Result
By following this step, we have now a white noise riser that also has space and depth.
4. Optional: Prevent Clipping
The reverberation effect added in the previous step makes the audio volume higher of the whole white noise riser. The volume is higher since we add the effect on top of the full riser sound, as an extra.
The higher audio volume of the white noise riser can be a problem since it can add digital distortion. When the signal that comes out of the reverberation plugin is too high in volume, then the signal can start clipping in the EQ plugin. Such clipping results in digital distortion.
The digital distortion from too high audio volume clipping in plugins sounds bad for most people. This type of distortion may not be easily hearable, but it can be hearable on other speakers. Furthermore, such distortion is different from the sound from a clipping distortion effect plugin (that can sound good).
Here follow some steps by which we can add a limiter plugin with practical settings to the white noise riser:
- Add a limiter plugin after the reverberation plugin from the previous step.
- Set the limiter to these settings:
- Threshold: 0 dB
- Ceiling (out ceiling/margin): -0.10 dB
- Gain: 0 dB
- Lookahead: 1.5 ms
- Release: 100 ms
Result
Maybe the limiter plugin does nothing, but probably your limiter does something, but just a very little. Moreover, when it does something, then the sound quality of the white noise riser has increased.
5. Optional: Automatic Panning
A white noise riser is one of the most common sound effects in EDM tracks, so it is not something original. Plus using white noise on other elements in tracks is also very common.
There is a well-known method to make a white noise riser less standard. Also, that same method makes the riser better hearable when played together with other white noise elements. That method is adding an auto pan effect.
An AutoPan effect is just automatic panning. So with this effect, the sound pans from left to right automatically, which can configure in more detail.
Here follow some steps by which we can add an AutoPan plugin with some practical settings to the white noise riser:
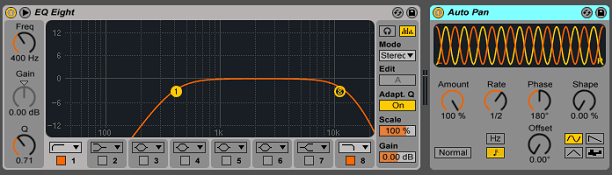
- Add an AutoPan plugin after the reverberation plugin from the previous step.
- Set the AutoPan to these settings (if your plugin has these settings):
- Amount: 100%
- Rate: 1/2
- Phase: 180°
- Shape: 0%
- Offset: 0°
- LFO Waveform: Sine (always a good choice), or sometimes square
Result
By following this step, we have now a more original white noise riser. Also, the riser is better hearable when there are multiple elements played at the same time.
6. Optional: Export or Record
When you have finished your white noise riser, then you probably want to use it also on other projects. However, you probably don’t want to make the riser every time you use it, because:
- It costs time and effort.
- You can make mistakes with copying settings.
- You can forget and lose settings.
- Multiple plugins that make the full white noise riser makes your computer slower.
- Sharing the exact white noise riser with other people can be hard.
A solution to the reuse problem is to make a sample of the white noise riser. Such a sample is just an audio file (like a .wav), which is usable in multiple projects and various DAW’s.
Sampling
Sampling works differently in every DAW. However, and as far as I know, making a sample of a sound is always done with exporting or recording the sound to an audio file. Also, all the DAW’s I know have a record function, but not all have an export function.
Choosing between exporting or recording is pretty easy. As a rule of thumb, use the export function when it is available, or else use the record function.
One thing to keep in mind is that the beats per minute (BPM) of the DAW project determines the duration of the sample. The higher (faster) the BPM, the shorter the duration of the sample. So, when you want to use the sample in a 128 BPM track, then the BPM in the DAW project should also be 128 BPM before exporting/recording.
Export Function
The export function automatic plays and records the white noise riser, and then stops the recording. The recording length gets most of the time determined by the length of a MIDI clip.
The length of such a MIDI clip should be the size of the drawn note from step 1 with an extra bar or more since the reverberation effect makes the sound longer. So, making the MIDI clip the same length as the note results in cutting the sound off in the exported sound. For example, when we have an 8 bars long note, then the MIDI clip should be 9 bars long.
An exporting function is fast, and most of the time almost instant, and then your sample is complete and usable.
Recording Function
The recording function is like the export function, but we have to do the playing, the recording, and the stopping of the white noise riser ourselves. Plus by recording ourselves, we always record (can be extremely small) unnecessary silence, which you have to cut afterward. So the recording function costs more time, and we can make easier mistakes with it.
Naming the Sample
When we have a finished sample, then it is a good practice to give it a descriptive name that makes sense. So we can find the sample easier and have a better understanding of what for a sample it is. A good descriptive name can have in its name these two characteristics:
- The number of beats per minute (BPM) we recorded the white noise riser.
- The note length of the white noise riser
Result
By following this step, we can have one or more white noise riser samples.
Closing Words
We can make a professional sounding white noise riser sound effect in at least three steps. Also, we can make the riser more original by adding automatic panning to it. Furthermore, when we export or record this effect, then we can use it also on other projects.
If you like this post, then you may want to look at some posts in the production part, since this post is also part of it.
Hopefully, you know now how to make a white noise riser sound effect. Also, when you know someone who likes to know more about making such an effect, then feel free to share this post. Additionally, do you have a tip about making a white noise riser?